Use Registry Editor to turn on automatic logon
To use Registry Editor to turn on automatic logon, follow these steps:
- Select Start, and then select Run.
- In the Open box, type Regedit.exe, and then press Enter.
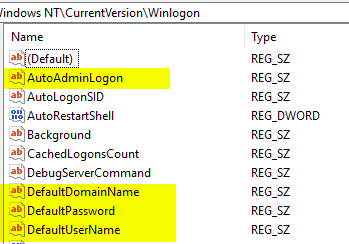
- Locate the
HKEY_LOCAL_MACHINE\SOFTWARE\Microsoft\Windows NT\CurrentVersion\Winlogonsubkey in the registry. - On the Edit menu, select New, and then point to String Value.
- Type AutoAdminLogon, and then press Enter.
- Double-click AutoAdminLogon.
- In the Edit String dialog box, type 1 and then select OK.
- Double-click the DefaultUserName entry, type your user name, and then select OK.
- Double-click the DefaultPassword entry, type your password, and then select OK. If the DefaultPassword value doesn't exist, it must be added. To add the value, follow these steps:
- On the Edit menu, select New, and then point to String Value.
- Type DefaultPassword, and then press Enter.
- Double-click DefaultPassword.
- In the Edit String dialog, type your password and then select OK.
If you have joined the computer to a domain, you should add the DefaultDomainName value, and the data for the value should be set as the fully qualified domain name (FQDN) of the domain, for example contoso.com..
Exit Registry Editor.
Select Start, select Shutdown, and then type a reason in the Comment text box.
Select OK to turn off your computer.
Restart your computer. You can now log on automatically.


